Saturday, November 16, 2013

Mother Earth Living

Hello all!

As you can probably guess from my 7 month absence from posting, I haven't done a whole lot of crafting lately.  However, the beauty (and sometimes the curse) of the internet, is that once things are put on it - they float around and gain a life of their own.

So I was slightly surprised when I received an email from a lovely magazine requesting to feature a project I posted on this blog way back in 2010. I was completely flattered and I felt kind of like some D list celebrity still earning credit for some cheesy cult classic film they were in a decade earlier. Be on the lookout for my Hallmark channel movie coming out soon, I'll be co-starring alongside Molly Ringwald and Steve Guttenberg!
 
The project was my Recycled Can Lid Plant Markers and I'm happy to say that those can lid markers were much more successful than the poor plants I marked them with (I really should stop trying to garden - it's incredibly sad).

The magazine is Mother Earth Living and they've put together a very lovely Handmade Holiday section in their November/December issue, featuring several quick, easy and thoughtful handmade holiday gift ideas.

 
I must say it gave me some great gift ideas as well - even if they're just for myself.  I really am the most gracious gift recipient I know!


They sent me a complimentary copy of the magazine and I must say I'm enjoying every page of it.  It's got tons of great tips on living every aspect of life: like food, skincare, sleep, etc., a little more healthily (is that a word?) and naturally.  I'm most impressed with how practical and non pretentious it is.  I've met some pretty high and might flax seed toting Granola's in my day and the vibe of this magazine is nothing like that.
 
So a big shout out and thanks to Mother Earth Living for including me in your fantastic magazine!
 
 
(FYI - I was not compensated for this post in any way and all the opinions expressed are my own. I just wanted to say thanks and toot my own horn a little bit.)

Wednesday, April 10, 2013

Pinthetic?

Spring has finally arrived - kind of (it's supposed to snow in my neck of the woods tomorrow), and that has prompted a great desire to see some blooms. 

I stumbled across this Pin the other day:

The idea is to place some small pebbles or marbles in the bottom of a vase, place a tulip bulp on top of them, add a bit of water just up to the roots and then enjoy the colors of spring.

It seemed easy enough, and I'll spare you the suspense by telling you that yes, it did actually work.  I did a little twist on it though that I thought I would share.

Instead of using vases, I used vintage glass insulators.  I love the color and shape of them and they worked great for this project as the interior of them is very narrow which allows the root of the bulb to have access to the water without need of marbles or rocks at the bottom.

However, some rocks were needed at the top of the bulb to secure it in place.

The only downfalls I found were that it was difficult to gauge the water level without removing the bulb to look, and also the tulips had a tendency to grow at an angle without having any support on the sides.

It was still lots of fun and a great way to use some vintage stuff I had lying around.

Thursday, March 21, 2013

Thought Provoking Thursday - Barefoot Sandals

Today’s topic: Barefoot sandals, adorable foot accessory, OR one more unnecessarily adorned step toward the decline of society as we know it?  You be the judge.

Have you seen these barefoot sandal things?  I first saw them for babies, and I thought, “okay, yeah that would be cute for a photo shoot or something maybe”, and then I started seeing them everywhere.  Barefoot sandals for beach weddings, barefoot sandals just because.  Barefoot sandals made out of ribbons, crocheted barefoot sandals, beaded barefoot sandals. It’s all starting to get ridiculous.

However, before I totally discounted this new trend, I wanted to look at both sides of the issue for a fair and accurate assessment of this new foray into dorsal pedis ornamentation (you like that? – it took a full 5 minutes of googling medical terminology to come up with that phrase!).

Ahem, okay, let’s start with the “Adorable foot accessory” stance.

-Other than socks or baby booties it might possibly be the only halfway practical infant footwear.

Everyone knows that one person who went out and bought a pair of $50 baby Nike’s for a 2 month old. Babies don’t need shoes because, NEWSFLASH, babies don’t walk. Junior isn’t going to need that non slip sole okay – not even when he starts rolling over. “My baby walked at 3 weeks because of those mini Air Jordan’s I got him”SAID NO ONE EVER!

-They are adorable for photos.

              I happen to think that baby feet are adorable enough in themselves, but if your child is cursed with abnormally ugly feet even as an infant, what better way to disguise them?

-They actually kind of make sense for a beach wedding.

                It’s one day, your day and you’re having a beautiful ceremony right there on the beach where you two first met.  You had fallen asleep and had 2nd degree burns on your back, he smacked you squarely between the shoulder blades with a volleyball.  Now as you stand in that same spot exchanging your vows, you can glance down at your green beaded barefoot sandals and be reminded of those blissful early days of your relationship when he used an entire vat of aloe vera gel to soothe your pain and win your heart.
That's all I've got for the "pro" side of this debate.

Now onto the “Decline of society” stance:

- First off, the name is an oxymoron.  “Barefoot” indicating that there is nothing on your foot!!! And then “sandal” which is defined as – well something on your foot!
san·dal 1 (s n dl)  n.

1. A shoe consisting of a sole fastened to the foot by thongs or straps.

2. A low-cut shoe fastened to the foot by an ankle strap.

3. A rubber overshoe cut very low and covering little more than the sole of the shoe.

4. A strap or band for fastening a low shoe or slipper on the foot.

Now I know there are a lot of oxymorons out there and they’re used every single day, like “useful man” or “delicious vegan dish”, but as a general rule, I really think they should be avoided at all costs.

Could no one come up with a more accurate monicker?  How about 'Toe floss', 'Foot thong', 'Ankle Bib', . . .

-The top of your foot doesn’t need adornment.  Lots of people have issues with their feet.  Most people hate their toes.  Toenail fungus runs amock, athlete’s foot can be debilitating, dry cracked heels are an epidemic, and don’t even get me started on hammer toes.  But none of these issues  are on the top of the foot?  Who wants to hide the top of their foot and bring more attention to their kankles? Personally, the top of my foot might be my most flawless feature.  I don’t want to cover that up.


-Where are you going to wear these? On the beach, okay I suppose but who wears jewelry (even foot jewelry) to the beach?  And think of the tan line that baby is going to cause! Plus have you ever walked on hot sand? Hello, that toe floss ain’t going to be much good when you’ve got 100 yards of boiling sand to traverse. 

Here you’ll see that someone was clever enough to take the barefoot sandal phenomenon out of the beach and into the work place by pairing them with some pumps.  This looks ridiculous.  They’re like lace spats and spats are the shoe versions of a dicky.  Nobody needs a foot dicky – NOBODY.


Well I know which way I’m leaning, but I’m going to let you all make your own decision. Leave me a comment and give me your take!


Friday, March 8, 2013

Thrifted Treasures


I love to pop some tags.  I’ve quite often only got 20 dollars in my pocket and I’m always looking for a come up. 
I find some of my best things at thrift stores, flea markets and garage sales.  Most of them I keep for myself because I couldn’t bear to part with them.  Others end up in the vintage section of my Etsy shop.  I hate to keep them all to myself though so I thought I’d take the opportunity of sharing some of my thrifted treasures with you. 
Today I’m showing off my chalkware owl.  This gem was purchased in the former chicken shed of some stranger’s acreage, for I think around $6. I could tell you the back story behind that but I think it’s much more intriguing if I let you come up with an explanation your own.


I adore chalkware. I’m not sure why. Probably because the things that are made out of it are usually incredibly bizarre or incredibly cute. They were often painted with some fabulous colors too.  

I haven’t been able to find a pad of paper that fits exactly but I found one that was close enough and there’s even a little hole to hold a pencil.I wanted him on the fridge, and while I had some well founded concerns of it falling off, I’ve glued enough super powerful magnets on the back of this baby that it’s magnetism may actually be affecting compasses within a 5 mile radius of the house.

Thursday, February 14, 2013

Monday, February 4, 2013

It's okay to be jealous

"Hey Amy. How was your weekend?"

"Hi, good. How was yours?"

"Not bad.  Do anything exciting?"

"Hmmm, well I watched The Smurf's with the kids on DVD."

"Did they like it?"

"Yeah, for the most part. They kind of lost interest though towards the end."

"Was it getting a little slow?"

"No, not really. It's just I had to pause it to go get my camera and then I had to keep rewinding with it and fiddling with the right angle to take some pictures of this great crocheted afghan that was in one of the scenes - you know so I could figure out how to make it."

 (Seriously- look how fabulous this is! I have no idea what happened in the movie after this scene, I was too obsessed with this blanket.)

"Oh . . . I umm see. What did you do on Sunday?"

"I crocheted socks for my chair!!"


"Ooookay yeah, well I gotta go. Talk to you later."

Some people just can't handle the awesomeness of my life.

Wednesday, January 23, 2013

Brace yourselves!

Guess who's got a new item in her Etsy shop??

No, really, guess . . .
I'm waiting . . .

Okay, fine - some people like guessing games you know. . . but obviously you're not one of them so I'll just go ahead and tell you.

It's me!
 

I've actually got 5 new items in the shop. Granted, they're all variations of the same product but hey, progress has been made!


I think they're adorable and would be a perfect gift for a soon to be mom or someone who just really likes animals that wear hats, or shirts with no pants, or overalls with no shirts - what the hell?!


Really I'd like to think that anyone who enjoys vintage children's book illustrations would like one of these cute little keychains.

 I'm glad I finally found a use for some of the older vintage books I've picked up at garage sales and flea markets. These weren't in the best of shape but since the images are small I was able to rescue and preserve some of them on these little wooden cubes.
Click my Etsy link on the side to check them out in the shop if you'd like.

Wednesday, January 2, 2013

DIY jewelry displays

The majority of my recent crafty DIY projects have centered around spicing up the bedroom . . . .no, I haven't been knitting wool bustiers (itchy).  I mean spicing it up interior design wise. 

I determined that I wanted my jewelry on display instead of hidden away in my jewelry case. I find that when it's visible it gets worn a lot often, plus it seems a shame to keep things that I find so attractive and sentimental inside a drawer.

I started by displaying my necklaces.  This was as simple as screwing some cup hooks into the bottom of an already existing shelf.

 
Then I took an old photo frame, replaced the backing with a piece of foam core, wrapped it with a layer of quilt batting and white fabric and made my own mini pin board for my brooches.
 

Then it was on to my favorite things - my rings.  I have a recent obsession with what my friends like to call "big ass rings" and I needed somewhere to display them.  I solved that problem with some frames and felt:


Here's a quick how to in case anyone is interested.

I started with some fabulous IKEA frames - of course you can use whatever frames you have available.


I had to remove their backs and the glass (which was actually plastic).  Then I got out my stash of felt and started rolling up some tampons.  Or at least that's what they started looking like to me.  I had to do some experimentation to determine how much felt was needed for each roll.  My white felt was quite thick (super absorbency) and I only needed about 5 inches in length.  The width was about 1 inch longer than the width of my frame opening.  

 I used a line of hot glue to hold my roll together.
 
When I had enough I hot glued them to a piece of cardboard sligtly larger than my frame opening.  Be sure to hot glue them securely and as tight together as possible.
 
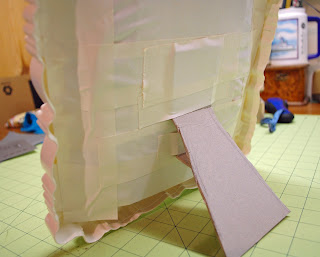
 This is when things got really high tech! I couldn't use the original back of my frame as it wouldn't accomodate the thickness of my felt, so I used the handyman's greatest tool - duct tape.  It looks classy though because I got the white duct tape to match my frame!!

 
It worked quite well.  I used some command strips to hold this one to the wall and it's been 4 months and it hasn't fallen apart yet so I'm calling that a success!

I used a nice burnt orange felt on my other frame. It wasn't as thick as the white so I ended up rolling up about 7 inches instead of 5, but aside from that everything else was the same.


 I wanted this one to stand on my shelf so I used my duct tape and some really sturdy cardboard to create a stand on the back.

 
Hope you can use some of these techniques to create your own jewelry displays.